What is ZUGFeRD?
ZUGFeRD (Zentraler User Guide des Forums elektronische Rechnung Deutschland) is a German e-invoicing standard that embeds machine-readable XML data inside a human-readable PDF. The result is a hybrid PDF/A-3 document that satisfies both legal archiving requirements and automated B2B processing workflows.
Since January 2025, B2B e-invoicing has become mandatory in Germany for transactions between VAT-registered companies. ZUGFeRD (profile EN 16931 / XRechnung) is one of the accepted formats. If you manage invoices inside a no-code database like SeaTable, this post shows you how to generate fully compliant ZUGFeRD PDFs with a single button click — no coding required on your part.
How the Automation Works
The solution consists of three parts:
- A backend API (running at
https://app.zevix.de) that accepts invoice data, validates it against the EN 16931 standard, and generates the ZUGFeRD PDF. - An account settings web page that lets you map your SeaTable table fields to ZUGFeRD business terms (BT-1 through BT-161).
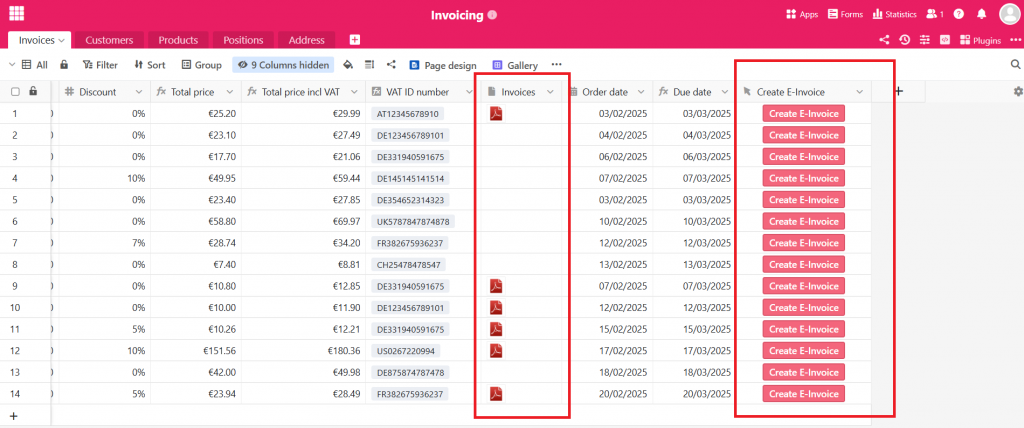
- A SeaTable button script that triggers invoice generation for the currently selected row, polls for the finished PDF, and uploads it back to the same row as an attachment.
Step 1 — Configure the Connection
Open the Settings UI and navigate to the Connection section. You need two values from your SeaTable account:
- Base ID — the unique identifier of your SeaTable base (found in the base URL or API settings).
- API Token — a read/write token scoped to the base. Generate one under Base Settings › API Token.
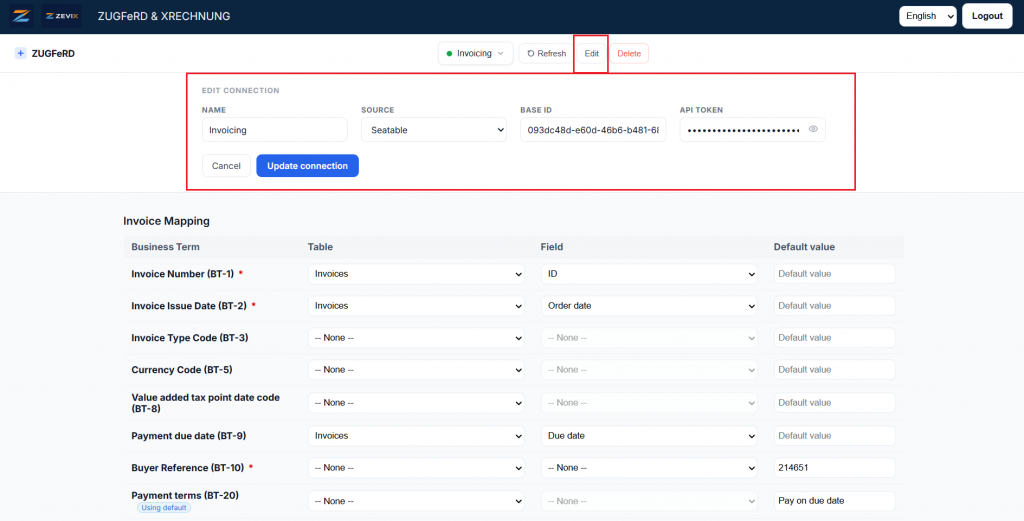
The connection settings are saved automatically after a short debounce — there is no Save button to press. A toast notification confirms when the data has been persisted.
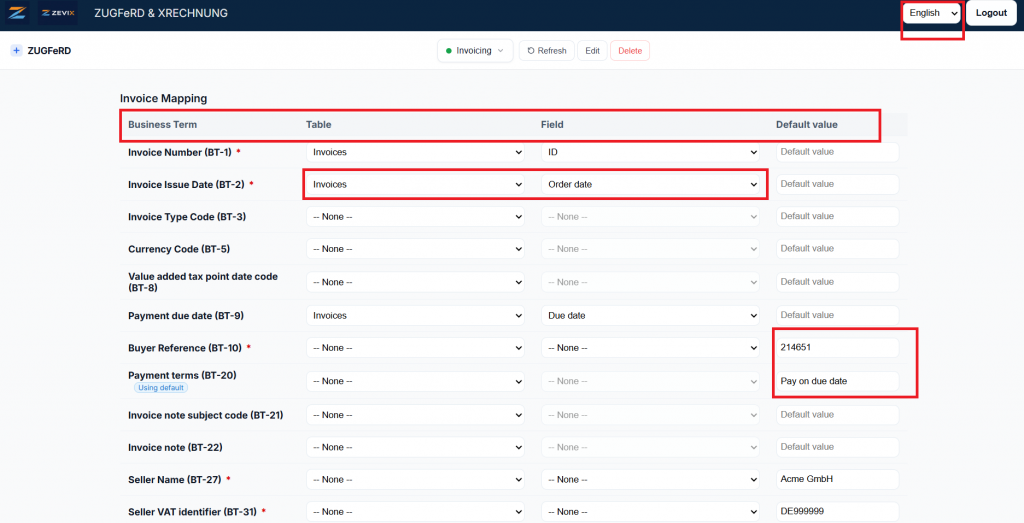
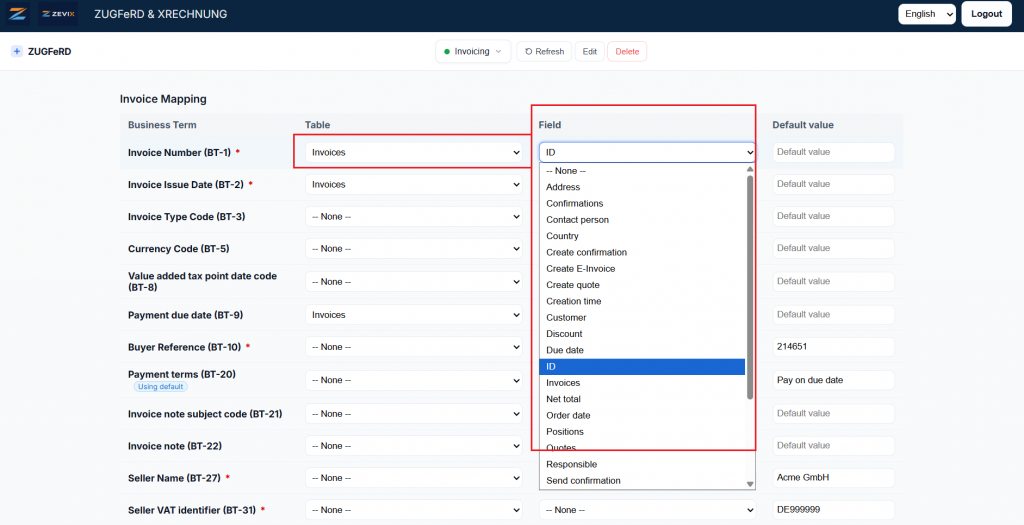
Step 2 — Map Your Tables and Fields
ZUGFeRD defines over 100 business terms (BT-1 through BT-161) that describe every aspect of an invoice: parties, line items, tax rates, payment details, and more. The mapping panel lets you link each business term to a specific table and field in your SeaTable base.

The mandatory fields (marked with an asterisk) that must be mapped or given a default value are:
| Business Term | ZUGFeRD ID | Notes |
|---|---|---|
| Invoice Number | BT-1 | Unique invoice identifier |
| Invoice Issue Date | BT-2 | Date format YYYY-MM-DD |
| Payment due date | BT-9 | Required if you don’t map BT-20 in stead. |
| Buyer Reference | BT-10 | Leitweg-ID or order reference |
| Payment terms | BT-20 | Required if you don’t map BT-9 in stead. |
| Seller Name | BT-27 | Legal company name |
| Seller VAT Identifier | BT-31 | e.g. DE123456789 |
| Seller Electronic Address | BT-34 | E-mail used for e-invoicing |
| Seller City / Postcode / Country | BT-37/38/40 | Registered address |
| Seller Contact Name / Phone / Email | BT-41/42/43 | Contact person of seller |
| Buyer Name | BT-44 | Legal name of the customer |
| Buyer Electronic Address | BT-49 | Buyer e-mail address |
| Buyer City / Postcode / Country | BT-52/53/55 | Buyer address |
| Payment Means Type Code | BT-81 | e.g. 58 for SEPA credit transfer |
| Payment Account Identifier (IBAN) | BT-84 | Payee bank account |
| Invoice Line Identifier | BT-126 | Line item ID |
| Invoiced Quantity & Unit Code | BT-129/130 | e.g. 1 / C62 (piece) |
| Item Net Price | BT-146 | Unit price excluding VAT |
| Invoiced Item VAT Rate | BT-152 | e.g. 19 (for 19 %) |
| Item Name | BT-153 | Name of goods/service |
Step 3 — Add the Button Script to SeaTable
Once your mapping is saved, add a Button column to your SeaTable invoices table. Set the action to Run Script and paste the following JavaScript:
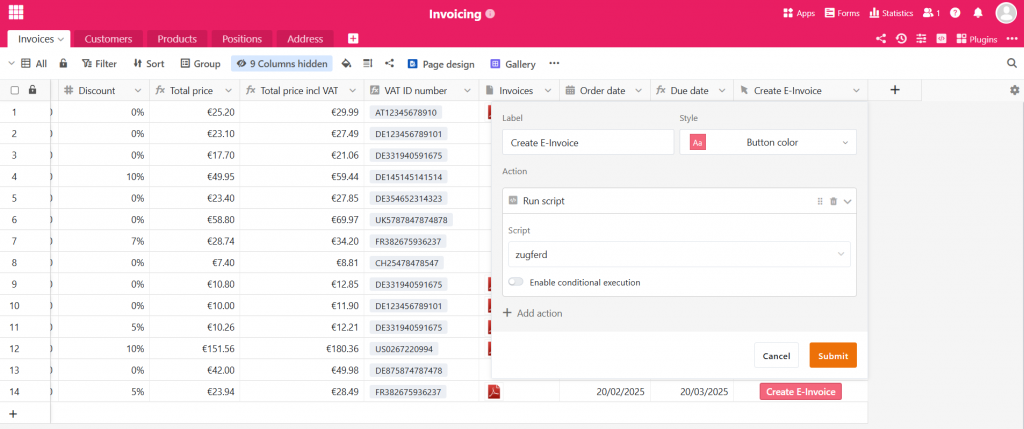
The Button Script
Customise the four constants at the top of the script to match your environment, then save.
(async () => {
  try {
    const API_BASE        = 'https://app.zevix.de';
    const settingsId      = 2;                          // Your settings profile ID
    const targetTableName = 'Invoices';                 // Table that holds the attachment field
    const targetFieldName = 'Invoices';                 // Attachment column name
    const SEATABLE_SERVER = 'https://cloud.seatable.io';

    const recordId        = base.context.currentRow._id;
    const apiToken        = '<replace_with_your_api_token>';
    const seatableApiToken = '<replace_with_your_seatable_token>';

    // ── Phase 1: Trigger invoice generation ──────────────────────────────────
    const triggerRes = await fetch(`${API_BASE}/api/invoice/zugferd`, {
      method: 'POST',
      headers: {
        'Content-Type': 'application/json',
        'Authorization': `Bearer ${apiToken}`,
      },
      body: JSON.stringify({ settingsId, recordId }),
    });
    if (!triggerRes.ok)
      throw new Error(`Trigger failed: ${triggerRes.status} ${triggerRes.statusText}`);

    const { downloadUrl } = await triggerRes.json();
    console.log('Invoice requested — waiting for PDF…');

    // ── Phase 2: Poll until the PDF is ready ─────────────────────────────────
    let pdfBuffer = null;
    while (true) {
      await new Promise(r => setTimeout(r, 2000));
      const pollRes = await fetch(`${API_BASE}${downloadUrl}`);

      if (pollRes.status === 202) { console.log('Still generating…'); continue; }
      if (pollRes.status === 404) throw new Error('Download link expired. Please retry.');
      if (!pollRes.ok)            throw new Error(`Poll error: ${pollRes.status}`);

      pdfBuffer = await pollRes.arrayBuffer();
      break;
    }

    const filename = `invoice_${recordId}_${Date.now()}.pdf`;
    console.log(`PDF ready (${pdfBuffer.byteLength} bytes). Uploading to SeaTable…`);

    // ── Phase 3: Upload the PDF to SeaTable file storage ─────────────────────
    const stHeaders = { Authorization: `Token ${seatableApiToken}` };

    const { workspace_id, dtable_uuid, access_token } =
      await (await fetch(`${SEATABLE_SERVER}/api/v2.1/dtable/app-access-token/`, { headers: stHeaders })).json();

    const { upload_link, parent_path, file_relative_path } =
      await (await fetch(`${SEATABLE_SERVER}/api/v2.1/dtable/app-upload-link/`, { headers: stHeaders })).json();

    const form = new FormData();
    form.append('parent_dir',     parent_path);
    form.append('relative_path',  file_relative_path);
    form.append('filename',       filename);
    form.append('file', new Blob([pdfBuffer], { type: 'application/pdf' }), filename);

    const uploadJson = await (await fetch(`${upload_link}?ret-json=1`, { method: 'POST', body: form })).json();
    const uploaded   = Array.isArray(uploadJson) ? uploadJson[0] : uploadJson;

    // ── Phase 4: Attach the uploaded file to the row ──────────────────────────
    const fileUrl = `/workspace/${workspace_id}${parent_path}/${file_relative_path}/${uploaded.name}`;

    await fetch(
      `${SEATABLE_SERVER}/api-gateway/api/v2/dtables/${dtable_uuid}/rows/`,
      {
        method: 'PUT',
        headers: { Authorization: `Bearer ${access_token}`, 'Content-Type': 'application/json' },
        body: JSON.stringify({
          table_name: targetTableName,
          updates: [{
            row_id: recordId,
            row: {
              [targetFieldName]: [{ name: uploaded.name, size: uploaded.size, type: 'file', url: fileUrl }],
            },
          }],
        }),
      },
    );

    console.log('ZUGFeRD PDF successfully attached to the row.');
  } catch (err) {
    console.error(err);
    throw err;
  }
})();
Script Walkthrough
- Phase 1 — Trigger: A
POST /api/invoice/zugferdcall sends thesettingsId(which tells the backend which field mapping to use) and therecordIdof the current SeaTable row. The backend reads all mapped fields from SeaTable and returns adownloadUrl. - Phase 2 — Poll: Because PDF/XML generation may take a few seconds, the script polls the download URL every 2 seconds until the server responds with HTTP 200 (ready) instead of 202 (pending).
- Phase 3 — Upload: The PDF binary is uploaded to SeaTable’s own file storage via the upload-link API, so the file lives inside your base’s storage quota.
- Phase 4 — Attach: The uploaded file’s metadata (name, size, URL) is written back to the attachment column of the triggering row using the SeaTable API Gateway.
Watching It in Action
The short screen recording below shows the full end-to-end flow: opening the Account Settings UI, configuring a connection, mapping fields, and clicking the Generate Invoice button in SeaTable to produce a ZUGFeRD-compliant PDF in under 10 seconds.
Tips & Troubleshooting
Cross-table resolution
The backend resolves linked records automatically, but the Invoice Number (BT-1) must be mapped to a field in the same table from which you trigger the button. Mapping it to a linked table will cause a validation error.
Default values
Use the Default value column in the mapping panel for static data (currency, country code, VAT rate) rather than storing identical values in every row. This keeps your base clean and reduces data-entry errors.
Token security
The SeaTable button script stores tokens as plain strings inside the script body. For production use, consider storing them in SeaTable’s Secrets feature (available in SeaTable Enterprise) and reading them with base.getSecrect('key') to keep credentials out of the script text.
Multiple settings profiles
The settingsId constant lets you maintain separate mapping profiles for different invoice types (e.g., domestic vs. EU). Create a new profile in the Settings UI and set a different settingsId in each button column.
Requirements Summary
| Component | Requirement |
|---|---|
| SeaTable plan | Any plan with JavaScript button support (Free and above) |
| Backend API token | Access to backend services (https://app.zevix.de) |
| SeaTable API token | Read + write access to the target base |
| Account Settings profile | At least one profile configured in the Account Settings UI (https://account.zevix.de) |
| Mandatory BT fields | All mandatory business terms mapped or given a default value |
Conclusion
With the ZUGFeRD + SeaTable integration you can go from a plain spreadsheet of invoice data to a legally compliant, machine-readable ZUGFeRD PDF in seconds — all without leaving your browser or writing a single line of code yourself. The React settings UI handles the one-time field mapping, and from then on every invoice is just one button click away.
Questions or feedback? Leave a comment below or reach out via the contact form.